Heliconia (Heliconia) is a true tropical wonder, captivating with its bright, unusual inflorescences that resemble a bird’s beak or the blade of a spear. Because of the characteristic shape of its flowers, heliconia is sometimes called “lobster claw” or confused with ornamental bananas. Its native range includes Central and South America, as well as some Pacific islands. But modern growing methods — especially container culture, winter gardens, terraces, and protective sheltering — make it possible to cultivate heliconia successfully in Ukrainian conditions as well, both indoors and outdoors during summer.
Botanically, heliconia belongs to the family Heliconiaceae and includes more than 200 species. Among them are both compact plants and true giants reaching 4–5 meters in height. Its defining features are large glossy leaves similar to banana leaves and complex inflorescences with brightly colored bracts in red, yellow, orange, or pink. The actual flowers are hidden between the bracts and, in their natural habitat, are pollinated by hummingbirds.
The most common heliconia species for amateur cultivation are:
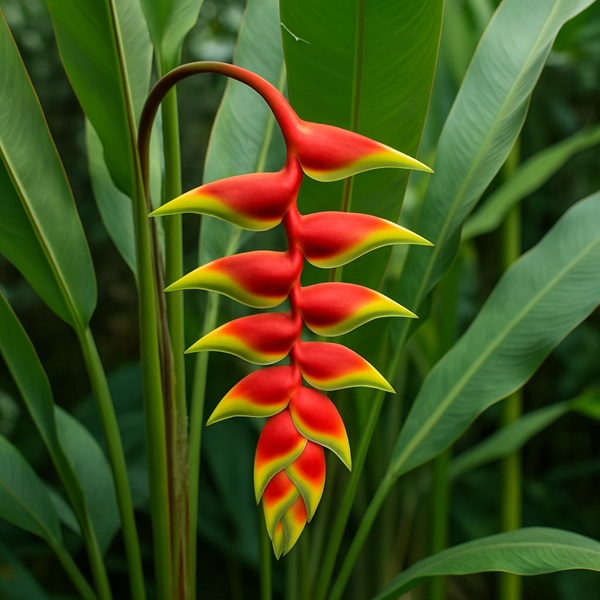
Heliconia rostrata — the best-known species, with hanging red-and-yellow bracts;
Heliconia psittacorum — compact, up to 1 meter tall, convenient for growing in pots;
Heliconia bihai — a massive plant with upright inflorescences;
Heliconia stricta — ideal for greenhouses, with many cultivated forms.
In the Ukrainian climate, heliconia is usually grown in containers. In summer, it can be moved to a balcony, terrace, or garden, but when the temperature drops below +10°C, the plant must be brought indoors. Heliconia needs warmth, high air humidity, and good lighting — under these conditions it will develop vigorously and may even reward you with blooms.
Planting heliconia is a crucial stage that determines its further development. First of all, you need to decide where you plan to keep it: in open ground with later lifting, in a container for a balcony, or as a houseplant that is moved outdoors in summer. All options require spring planting — from March to April, when daylight noticeably increases.
The substrate should be rich, light, and well-drained. A recommended mix is: 2 parts turf soil, 1 part leaf soil, 1 part humus, and 1 part coarse sand or perlite. A drainage layer of at least 5 cm is essential. If grown in a container, it is better to choose a large pot right away — heliconia has a developed root system and fills the container quickly.
The plant should be placed in a well-lit location, but without direct midday sun. East- or west-facing windows are optimal, while in the garden light partial shade is best. Heliconia does not tolerate drafts or sudden temperature fluctuations. After planting, it should be watered well, and the soil should be mulched to retain moisture. The ideal temperature for active growth is +20 to +28°C. Temperatures below +15°C slow development, and at +10°C the plant may experience stress and begin dropping leaves.
Heliconia needs regular, balanced watering. During the growing season — from March to October — the substrate should remain slightly moist at all times. It is important to avoid both drying out and overwatering. Ideally, water frequently and moderately with warm, settled water. In hot weather, this may mean up to 3 times a week; on cloudy days, less often.
Air humidity is a critical factor. Heliconia is a tropical plant, so dry air, especially during the heating season, can cause curling leaves, dry tips, and halted growth. The optimal humidity level is 60–80%. This can be maintained with misting twice a day, trays filled with wet expanded clay, or household humidifiers. During bud formation and flowering, humidity should remain as stable as possible.
Feeding is no less important. From April to September, heliconia should be fertilized once every 2 weeks with a balanced fertilizer for flowering or ornamental foliage plants. Products richer in phosphorus and potassium are preferable. In spring, growth stimulants such as humates can also be useful, while from August onward the nitrogen level should be reduced. This helps strengthen the plant before its dormant period.
With proper care, heliconia rarely suffers from disease, but if growing conditions are disrupted it can become vulnerable to fungal infections and pests. Problems most often appear when ventilation is poor, humidity is too high, or water stagnates.
The most common diseases are:
Gray mold (botrytis): develops in high humidity in a cool room. The leaves become covered with a fluffy gray coating and start to rot softly. Solution: prune affected parts, repot into a drier substrate, and improve ventilation.
Root rot: symptoms include wilting despite moist soil and blackening at the base of the stem. Treatment: repotting, removal of affected roots, and treatment with fungicides such as Fundazol or Maxim.
Leaf spot: brown or yellow spots that gradually spread. The cause may be infection or unsuitable conditions. Affected leaves should be removed, and the plant treated with products such as HOM or Fitosporin.
Possible pests include:
Spider mite: becomes active in dry air. Signs include silvery dots and webbing. Solution: increase humidity and spray with acaricides such as Actellic or Vertimec.
Scale insect: brown plaques on stems and leaves, along with sticky residue. Treatment: mechanical cleaning followed by an insecticide.
Mealybug: a white cotton-like coating in the leaf axils. Solution: alcohol-and-soap treatment, or products such as Aktara or Confidor.
Prevention is the best treatment. It includes regular ventilation, proper watering, disinfecting the soil, and monthly treatment with biofungicides during the growing season.
The easiest way to propagate heliconia is by dividing the rhizome. This is a reliable, effective, and fast method of obtaining new plants, especially if the main clump is already mature. Growing from seed is also possible, though it is better suited to enthusiasts and breeders.
1. Rhizome division
The best time is spring. The plant is removed from the pot, and the rhizome is cut into sections so that each part has a growth bud and a piece of root. The cut surfaces are treated with ash. The divisions are planted in new containers; watering during the first 1–2 weeks should be cautious, and no fertilizer should be applied.
2. Growing from seed
This is a more difficult but possible method. The seeds are soaked in warm water for 48 hours, then sown in a sterile light substrate and covered with film. The germination temperature should be +25 to +28°C. Seedlings appear in 3–8 weeks. The first flowering comes in 2–3 years.
Tip: to preserve varietal traits, it is better to use division, since seedlings may produce variable results.
Heliconia has a clearly defined dormant period and active growth phase. To ensure that the plant continues to grow and bloom year after year, care should be organized with seasonal changes in mind.
Spring:
– repotting and soil renewal;
– rhizome division;
– increased watering;
– the start of feeding;
– moving the plant to a balcony or garden once stable warmth arrives.
Summer:
– intensive growth and possible flowering;
– regular watering and misting;
– feeding once every 10–14 days;
– protection from overheating;
– sanitary pruning of leaves.
Autumn:
– gradual reduction of watering;
– stopping fertilization;
– moving the plant to a warm indoor space;
– preventive pest treatment;
– pruning if necessary.
Winter:
– dormant period;
– temperature of +14 to +18°C;
– minimal watering, once every 10–14 days;
– no fertilizer;
– supplemental lighting if needed.
Heliconia is demanding, but also extraordinarily rewarding. It can decorate any interior or garden if you provide it with comfortable conditions — warmth, humidity, and a tropical rhythm of care.