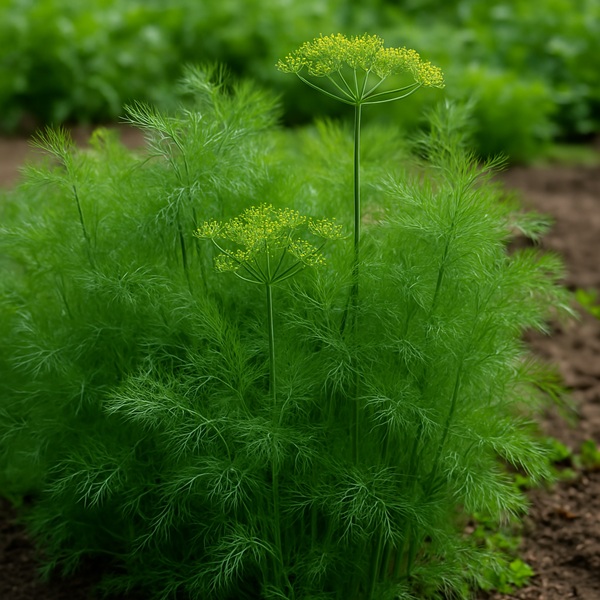
Dill (Anethum graveolens) is one of the most widespread leafy crops, widely used in cooking, folk medicine, preserving, and even as an ornamental plant. In Ukraine, it is grown everywhere — from the western regions to the southeast — both in open ground and in greenhouses, on balconies, and on windowsills. Dill’s popularity is explained by its low-maintenance nature, short growing period, ability to be harvested repeatedly during the season, and high nutritional value. The plant contains vitamins A, C, and group B, folic acid, potassium, calcium, essential oils, and flavonoids, which provide its characteristic aroma and beneficial properties.
Dill is an annual plant from the carrot family. It forms an upright stem, feathery foliage, and umbrella-shaped flower clusters. Its height depends on the variety and ranges from 30 to 150 cm. In cultivation practice in Ukraine, two main types are distinguished: leafy and umbrella-forming seed types. Leafy varieties produce abundant greenery and do not bolt for a long time, so they are used for frequent cutting. Umbrella types switch to flowering faster, are less leafy, but form large aromatic flower heads ideal for preserving and seed collection.
Among the popular varieties in Ukraine are Grenader, Kibray, Amazon, Bushy, Richelieu, Salut, Lisnohorodskyi, Hrybovskyi, and Dalekyi. Each has its own advantages. For example, ‘Kibray’ is known for its rapid growth and long harvesting period for greens, ‘Salut’ is resistant to bolting, and ‘Grenader’ is suitable for producing high-quality flower heads. When choosing a variety, it is important to consider the climate zone, the purpose of cultivation — for greens, flower heads, or seed — and the conditions of the plot. In northern regions, it is better to choose cold-tolerant and early-maturing varieties, while in the south, varieties resistant to heat and slow to bolt are preferable.
To grow dill with a rich taste and aroma, the planting site should be chosen correctly. Dill is a light-loving crop, so the plot should receive at least 6–8 hours of light per day. It can also grow in partial shade, but the greens will be less aromatic and the stems more elongated. In the southern regions of Ukraine, where summers are hot and dry, it is advisable to sow dill in spring or in August to avoid rapid bolting at the height of the heat.
The optimal soils are sandy loams and light loams, fertile, with neutral acidity (pH 6.0–7.5), permeable to water but still able to retain moisture well. Site preparation should preferably begin in autumn: remove plant residues, add compost at up to 5 kg per square meter, and if necessary carry out liming. In spring, the soil is dug to a depth of 20–25 cm, ash and superphosphate are added, and also a moderate amount of complex mineral fertilizer. Fresh manure is best avoided: excess nitrogen will lead to overly lush growth but worsen the flavor and increase nitrate levels. On heavy soils, it is advisable to add sand and humus to improve the structure.
The best preceding crops are cabbage, potatoes, tomatoes, cucumbers, onions, and legumes. Dill should not be sown after carrots, parsley, or celery, since they share diseases and pests. It is also not advisable to grow the crop for several years in a row in the same place. Dill is often used as a companion crop between rows of cabbage, potatoes, and beetroot, but it is important to provide enough space and avoid shading. Regular aeration is essential: soil compaction slows growth, especially at the early stages of development.
In Ukraine, dill can be sown from early spring, as soon as the soil warms to +3 to +5 °C. In the southern regions, this is the end of March; in central and northern ones, the beginning or middle of April. Dill belongs to short-day crops, so early sowing promotes the accumulation of essential oils and the formation of aromatic greens. For continuous harvesting of green mass, repeated sowings are carried out every 10–14 days until early August. For seed production, sowing in May–June is optimal. Winter sowing in October is also possible in prepared dry soil. Such sowings provide early greens in spring.
Dill seeds are coated with essential oils that slow germination. Therefore, before sowing it is recommended to soak the seeds in warm water for 24–36 hours, changing the water every 6–8 hours, then dry them slightly. They can also be pre-sprouted in a damp cloth. This speeds up emergence by 4–5 days. The seeds are sown in furrows 1.5–2 cm deep, with 20–30 cm between rows. In the row, 3–5 cm are left between plants. After sowing, the furrows are covered with loose soil, lightly firmed, and watered. Before emergence, the bed can be covered with row cover fabric.
Dill can also be grown through seedlings, especially in northern regions or where space is limited. Seeds are sown 3–4 weeks before transplanting into the ground, and the seedlings are moved at the stage of 2–3 true leaves. Still, caution is needed: dill does not tolerate transplanting well if the root is damaged, so it is better to use peat pots or grow it without pricking out. When sowing in greenhouses, it is important to ensure ventilation in order to avoid fungal diseases caused by excessive moisture and lack of air movement.
Although dill does not require complicated care, regular cultivation practices greatly influence the quality and quantity of the harvest. The most important are watering, loosening, thinning, and feeding. In dry weather, without watering, dill quickly stretches, the leaves become coarse, and they lose aroma and juiciness. In Ukrainian conditions, especially in the south and center, watering is done 2–3 times a week, depending on soil condition. It is important to maintain even moisture but avoid stagnant water. Watering is best done in the morning or evening.
Loosening is essential after every rain or watering to avoid crust formation, improve aeration, and ensure access to moisture. Dill is very sensitive to soil compaction, especially at the early stages. Timely thinning is another important element. When overcrowded, the plants stretch, shade one another, and the yield drops. Seedlings are thinned when 2–3 true leaves appear, leaving 5–7 cm between plants. The removed plants are perfectly suitable for consumption — this is valuable microgreens.
Feeding is carried out as needed, usually on poor, light, or sandy soils. The first feeding is given 2 weeks after emergence: mullein infusion at 1:10, vermicompost solution, or a light complex fertilizer such as nitroammophoska at 10–15 g per square meter. A second feeding is done 10–12 days later. Excess nitrogen should be avoided, as it promotes nitrate accumulation. For supporters of organic growing, nettle infusion, ash infusion, and fermented herbal extracts are suitable. Fertilizers should not be applied directly before harvesting — it is better to feed after each cutting.
The harvest time depends on the cultivation goal. Dill greens are cut when they reach a height of 20–30 cm, which happens about 30–40 days after sowing. The best time to harvest is morning, when the greens are full of moisture and essential oils. Plants are cut at a height of 3–5 cm above the soil, leaving the growing point intact. Under good conditions, 2–3 waves of harvest can be obtained from one sowing. To have greens continuously, dill should be sown in batches every 10–14 days.
To obtain flower heads and seed, the plants are left in the bed until full flowering and ripening. The flower clusters are harvested at the milk or wax stage — this is when they have the strongest aroma and are suitable for marinades. Seeds are collected when they turn brown but have not yet begun to shatter. The flower heads are cut, tied into bundles, and hung to dry in the shade. After that, the seed can easily be threshed and stored for up to 3 years in a dry, dark place.
Ways to preserve dill for winter:
Drying. The greens are washed, dried, chopped, and dried in the shade. Store in tightly sealed containers.
Freezing. Chopped greens or whole sprigs are placed in bags, containers, or molds with water or oil.
Salting. For 1 kg of greens, use 200 g of salt. Layer them in jars and store in the refrigerator.
Dill can also be grown as microgreens: the seeds are sown densely in trays with peat or coconut substrate, and young shoots are harvested after 7–10 days — an excellent source of vitamins in winter.
Although dill is considered a resilient crop, it can suffer from a number of diseases and pests, especially with overcrowding, stagnant moisture, or lack of crop rotation. The most common diseases are:
Phomosis. Causes brown spots on leaves and stems and leads to rot.
Downy mildew. A gray or purple coating on the leaves, especially in greenhouses.
Cercospora leaf spot. Dark spots with a border that dry out the leaf tissue.
Preventive measures include crop rotation, the use of disinfected seed, avoiding overcrowded sowings, greenhouse ventilation, and mulching.
The main pests are:
Carrot fly. Its larvae feed on roots and stems.
Aphids. They settle on the tops and suck out the sap.
Umbellifer moth caterpillars. They eat the leaves and damage the flower heads.
Control methods include organic remedies such as ash, garlic, and soap infusions, or biological products such as Fitoverm and Bitoxybacillin. Chemical treatments are best avoided, especially when growing dill for home consumption.
Growing dill at home is a good way to have fresh greens all year round. For this:
choose a sunny location such as a windowsill or balcony;
keep the temperature at +16 to +22 °C;
water moderately without stagnation;
sow into loose soil or peat tablets.
The first cutting of greens can be made as early as 30–35 days after emergence. To have dill constantly, it is worth sowing every 2–3 weeks. This approach provides a steady source of fresh, eco-friendly, vitamin-rich greens even in an apartment.